How to merge folders on Mac - without risking losing your files
Merging, or combining, folders is possible with Mac’s Finder, even if it’s not immediately obvious how. Clicking the wrong button can however be punished with the irreversible loss of your files, so you need to tread carefully! This article will safely guide you through the treacherous waters of Finder’s hidden Merge command.
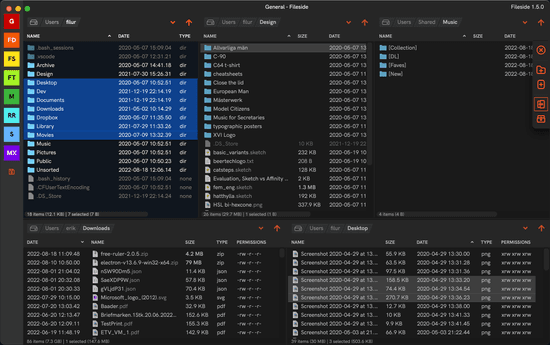
Finder still only offers limited merging possibilities, however. But where Finder stops, Fileside’s more complete merging functionality steps in. The second half of the article explains how to merge folders painlessly with Fileside.
The case for folder merging
There are a few common scenarios where you might end up with two separate folders holding partially the same contents. For example:
- You might need to recover parts of a backup into an existing folder structure.
- You might have had a large transfer across a network fail halfway through, and want to continue where it left off.
- You have been working on the same project across two computers, with some files now living on both.
How can we combine the two folders into one in cases like these?
Moving folders with Finder
When dragging items from one Finder window to another, by default they will get moved. If you hold down the ⌥ (Option/Alt) key while releasing the mouse button, the items will get copied instead. Merging is only available for the latter.
How Finder deals with conflicts
When moving a folder into another location where a conflicting folder of the same name already exists, Finder will offer you the options to Stop or Replace.
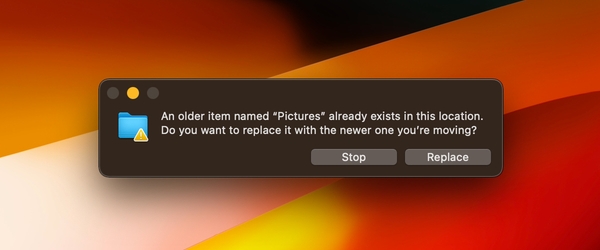
Stop will just cancel the transfer, as you’d expect. But somewhat more unexpectedly, Replace will actually nuke the entire destination folder, along with its contents, and put the source folder in its place.
If you hit Replace by accident, the removed files are gone forever. There is no undo, and the files do not get sent to the Trash. Creating a backup before starting is therefore a crucial step.
As you can see, no merge option is available in this dialog. But if you instead choose to copy the source folder by holding down ⌥, then voilà, a Merge button will appear in the conflict resolution dialog.
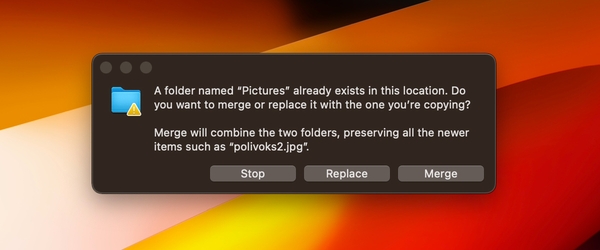
There are a few cases where the Merge button might still not appear despite holding ⌥, for example when the filenames inside the two folders are exactly the same.
How Finder merges
Once you’ve successfully uncovered and clicked the Merge button, the merging will proceed as follows:
- If a file exists in the source folder that is not in the destination, it is copied over.
- If a file with the same name exists in the destination, it will get overwritten by the source file, if the source file is newer than the destination file.
- Any files in the destination not present in the source will be left as is.
There’s no way to skip conflicting files, or to keep the older versions around. So only use this method if you’re certain that it’s the later version of each file you want to keep.
You do get more options, like Keep Both, if you restrict yourself to only dragging files. However, this approach would get tedious quickly if you have multiple nested subfolders to merge.
Merge strategies with Finder
To summarise, here are your options for handling folder conflicts with Finder.
| Resolution | Available | Undoable |
|---|---|---|
| Keep both | - | - |
| Skip | - | - |
| Replace older files | ✓ | - |
| Replace all files | - | - |
| Replace whole folder | ✓ | - |
How to merge with Finder in 5 steps
Assuming that replacing older files with their newer equivalents is how you want to resolve any conflicts, let’s go ahead.
1. Ensure the two folders are distinct
Apple’s own documentation states:
The Merge option appears only if one of the folders contains items that are not in the other folder. If the folders contain different versions of identically named files, the only options are Stop or Replace.
2. Make a backup of the destination
Since it’s so easy to lose your files accidentally when merging, start by making a complete copy of the destination folder you are merging into.
Remember, the Replace option will always delete the files in the destination folder. The Merge option will delete any files in the destination folder that are older than their source folder equivalents.
3. Drag and drop
Drag the source folder to the location containing the destination folder while holding down ⌥.
4. Select Merge
Now, the Merge button should appear in the dialog. Click it to merge all the newer files into the destination.
5. Delete source folder
Since holding ⌥ always causes a copy to be made, you need to delete the source folder manually once the merge has finished.
A better way
Surely there must be a better way to handle this? We believe so. That’s why Fileside includes a flexible conflict resolution dialog that gives you a lot more control over how your folders get merged, and which files to keep.
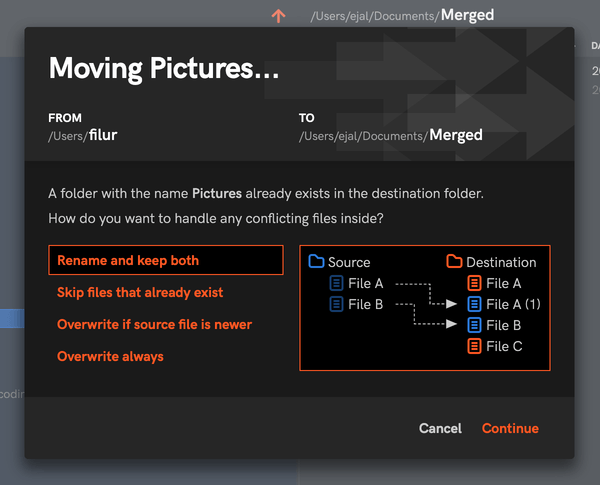
Regardless of which merging option you choose, every move or copy operation is fully undoable, so you never have to worry about losing your files.
How Fileside deals with conflicts
When dragging a folder without holding down any modifier keys, Fileside will always ask if you want to copy or move. Merging is available regardless of which option you choose.

It will then check if any names in the dragged selection match any in the destination folder. If they do, the conflict resolution dialog pops up.
Note that this dialog will show up as soon as a name matches, even if the two folders might not actually share any filenames internally.
How Fileside merges
Fileside gives you four different options for merging folders.

For all four options, files in the source folder that don’t exist in the destination will get transferred across unchanged, and files in the destination not present in the source will be left as is.
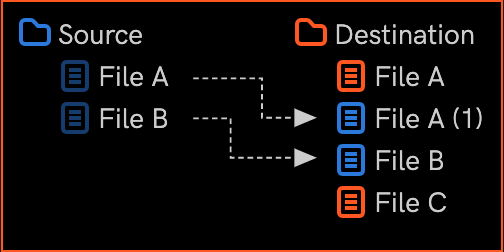
Rename and keep both
If a file with the same name exists in the destination folder, the source file will be copied to a new, unique name by adding a sequential number at the end. That way both the original and the merged-in file will be preserved in the destination folder.
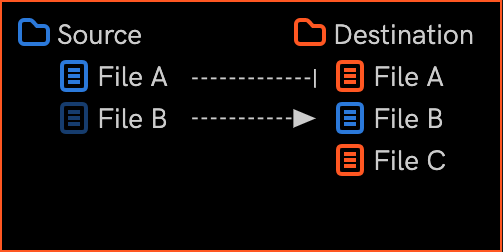
Skip files that already exist
If a file with the same name exists in the destination folder, the source file will be skipped and left in place in the source folder. This happens also for moves.
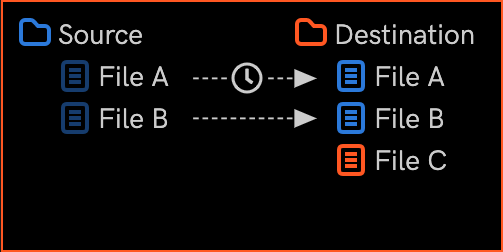
Overwrite if source file is newer
If a file with the same name exists in the destination folder, its last modified time will be compared with that of the source version. Only if it’s newer will the source file overwrite the destination file. This is the same method that Finder uses.
However, with Fileside, the older file will be moved to the Trash before getting overwritten, so that it can be recovered later if you need to undo.
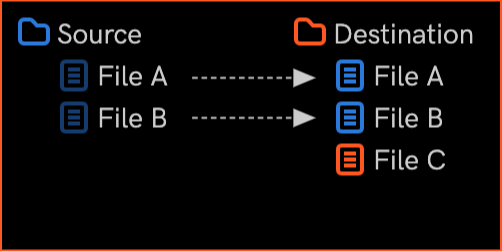
Overwrite always
If a file with the same name exists in the destination folder, it will always be overwritten by the source version.
Here too, the destination version will be moved to the Trash before being overwritten.
Undoing
If you change your mind after finishing a merge, you can always just hit ⌘Z (Cmd-Z) to restore the original state, regardless of which merge strategy you used.
Merge strategies with Fileside
To summarise, here are your options for handling folder conflicts with Fileside.
| Resolution | Available | Undoable |
|---|---|---|
| Keep both | ✓ | ✓ |
| Skip | ✓ | ✓ |
| Replace older files | ✓ | ✓ |
| Replace all files | ✓ | ✓ |
| Replace whole folder | - | - |
How to merge with Fileside in 3 steps
1. Make sure the two folders have the same name
The merge options will always appear as soon as there’s a name conflict.
2. Drag and drop
Drag the source folder to the location containing the destination folder, selecting either a copy or a move.
3. Select merge strategy
Choose your preferred method of resolving file conflicts.
Done and dusted
If that sounds like a better way of merging to you as well, feel free to download a fully functional trial version of Fileside here to try it out on any gnarly folder situations you might have got yourself into.
